Tutorial - Cover a Diary or Notebook
A common topic of conversation here at Berylune is whether or not we should blog craft tutorials. As we're pretty much always making something new around here, we've decided it won't take us long to photograph what we're doing and share it with you.
Our first tutorial is for a fabric cover for a notebook or diary. We needed a couple of diaries so we could keep track of our increasingly busy schedules; Amy decided to buy plain ones and cover them in pretty fabric. This tutorial is for A6 size, but you can adapt it to fit just about any dimensions.
Ingredients:
A hard covered A6 notebook/diary
Pretty fabric at least 30cm x 18.5cm
Felt at least 23cm x 16.5cm
Light weight interfacing 23cm x 16.5cm
Reel of thread - we have chosen a contrasting colour, but you can match your fabric if you prefer
Embroidery floss if you would like to decorate the front like we have
A basic sewing kit
An iron
You can complete this by hand sewing, but a machine is quicker!
1. Measure and cut your interfacing to to fit the notebook - it needs to be 1cm taller than the book both top and bottom, and be level with the edges of the closed book, taking the spine depth in to account. Cut the felt to the same size as your interfacing.
2. Cut your patterned fabric so it is 1cm larger than your interfacing at the top and bottom, and 4cm larger at the left and right sides.
3. Iron the shiny side of your interfacing on to the wrong side of your fabric, leaving your 1cm gaps top and bottom and your 4cm gaps at the edges.
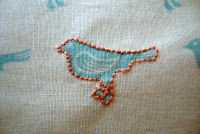
4. If you wish, embellish the front of your book; Amy has stitched around one of the birds on the fabric in a contrasting colour of embroidery floss. You could stitch your initials, the year or a subject for your notebook.
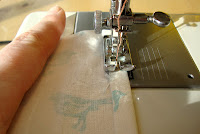
5. Fold in 1cm at both the left and right sides of your book cover and iron flat. Sew your seams down by hand or with a sewing machine.
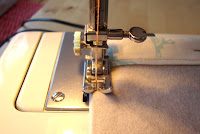
9. Stitch along the top and bottom of the book cover, leaving a 5mm gap from the edge - careful, if you stitch too far from the edge, your book won't fit! As you stitch, you will sandwich the felt between the pockets and secure it to your pretty, interfaced, fabric.
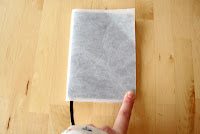
10. Give the whole thing an iron and slip your book inside.
Our first tutorial is for a fabric cover for a notebook or diary. We needed a couple of diaries so we could keep track of our increasingly busy schedules; Amy decided to buy plain ones and cover them in pretty fabric. This tutorial is for A6 size, but you can adapt it to fit just about any dimensions.
Ingredients:
A hard covered A6 notebook/diary
Pretty fabric at least 30cm x 18.5cm
Felt at least 23cm x 16.5cm
Light weight interfacing 23cm x 16.5cm
Reel of thread - we have chosen a contrasting colour, but you can match your fabric if you prefer
Embroidery floss if you would like to decorate the front like we have
A basic sewing kit
An iron
You can complete this by hand sewing, but a machine is quicker!
1. Measure and cut your interfacing to to fit the notebook - it needs to be 1cm taller than the book both top and bottom, and be level with the edges of the closed book, taking the spine depth in to account. Cut the felt to the same size as your interfacing.
2. Cut your patterned fabric so it is 1cm larger than your interfacing at the top and bottom, and 4cm larger at the left and right sides.
3. Iron the shiny side of your interfacing on to the wrong side of your fabric, leaving your 1cm gaps top and bottom and your 4cm gaps at the edges.
4. If you wish, embellish the front of your book; Amy has stitched around one of the birds on the fabric in a contrasting colour of embroidery floss. You could stitch your initials, the year or a subject for your notebook.
5. Fold in 1cm at both the left and right sides of your book cover and iron flat. Sew your seams down by hand or with a sewing machine.
6. Fold 1cm down along the top and bottom of the book cover and iron as before - use the edge of the interfacing as a guide.
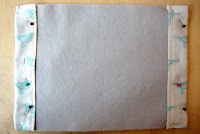
7. Lay your felt on top of the interfacing, lining up to the edges you have ironed at the top and bottom. You may want to place a few pins in the middle to keep it in place.
8. Fold the two 3cm flaps of fabric on either side of your fabric sandwhich to the edge of the felt and pin in place. These will form the pockets that the cover of your book will slip in to.
10. Give the whole thing an iron and slip your book inside.
Et voila!
Our first tutorial complete! We hope to be posting some more in the coming weeks, with guest posts from some of our talented friends and team.
Berylune, 45 Park Street, Leamington Spa CV32 4QN. www.berylune.co.uk


